There are many aspects of children and art that can be incorporated into a child development class. When exploring Children & Art, you can look at everything from its benefits to development, to why it needs to be open-ended and focus on the process over the product to how we talk about it with children. This lesson and corresponding activities infuses all of the above! Have a look to see how you can include children & art into your repertoire!
Set
- Begin by showing students the two images on the slidedeck. Ask students to observe each closely and write down the similarities and differences they notice between the two examples.
- Ask them if one image is considered “art” over the other and discuss their responses.
- This leads to the fact that art can be a matter of perspective! Discuss the following perspectives on children’s art. What is a child’s art to the following individuals (possible answers follow in parentheses)?
- What is a child’s art to a PARENT? (a display of talents, imagination)
- What is a child’s art to an EDUCATOR? (a teaching tool)
- What is a child’s art to a PSYCHOLOGIST? (a key to emotions, positive/negative events)
- What is a child’s art to a GRANDPARENT? (pride and joy, connectedness)
- What is a child’s art to a LIBRARIAN? (a way to enhance understanding of literacy)
- What is art to a CHILD? (a way to have fun, make decisions, be creative and express themselves)
- Regardless of the perspective, art is important and beneficial to a child’s development. To explore those benefits, students are placed in small groups and count off by 7 or 8, depending on which resource you choose to use and your class size. Each pair of students receives a topic and prepares a visual of the key information to present to the class. As each group presents, the class notes on the provided form. Resources to choose from are titled, “Why is Art Important in Schools” and “7 Amazing Benefits of Art for Kids You Might Not Know”.
- Visuals should include the benefit heading, 3 key points and at least 3 corresponding images associated with key points.
Materials
- iPad or Laptop
- Projector & Screen
- Crayons & Paper
- Scissors & Glue
- Play-doh
- Paint & Brushes
- Empty Cubes & Tubes
Activities
- As a bellringer, ask if children are more creative than adults and have them explain their response; discuss.
- Picasso wrote “Every child is an artist. The problem is how to remain an artist once he grows up.” Discuss…
- What do you think Picasso meant by this?
- What can we learn and apply to children to keep the creative process alive?
- Explore 3 Tips that correspond with the Picasso questions. The tips include:
- #1: Avoid DIRECTIONS & EXAMPLES…increases frustration, decreases freedom to create. Keep art OPEN-ENDED
- #2: The PROCESS over PRODUCT is most important (refer back to intro images)
- #3: Allow FREE CHOICE…develops independence
- Students will now participate in station activities in partners or small groups of 3. After they’ve completed each of the station activities, they must answer a reflection question about it using the provided form.
- Station #1: Provide students with a copy of Vincent Van Gogh’s Sunflower picture (select a version you like). Tell students to use crayons and draw theirs exactly like the image.
- Station #2: Provide students with a “Cut and Paste” Animal Worksheet (a TPT freebie) and tell them to complete as per the directions.
- Station #3: Provide students with play-doh and tell them to make a heart.
- Discuss their reflections: ALL of the station activities were “product” based. Many had specific examples and/or directions/steps to follow. All limited imagination and creativity because there was no free choice. Ask students what needs to change with these activities. Possible answers may include: Eliminate the examples, give lots of art mediums to choose from, no directions (other than safety), freedom to choose what to make, in whatever fashion desired. Encourage the process, the experimenting, etc. Note: if students don’t come up with these changes on their own, be sure to guide them to them.
- To illustrate the suggested changes, students participate in the following station activities that are process based (again in partners or small groups of 3):
- Station #1: Offer students a variety of paints and unique tools and objects to create a masterpiece of their choice.
- Station #2: Go outside and collect objects from nature to create a nature collage.
- Station #3: Provide students with empty tubes & cubes and have them create a stable sculpture.
- Continue with Tips by reading “PURPLE” and ask students to write 3 key takeaways about its message regarding children and art. This leads us to Tip #4!
- #4: Don’t fix a child’s artwork…discourages ability, creativity & self-esteem.
- Finally Tip #5: Watch your APPROACH when talking about their ART…don’t be generic! What does that mean? There are six traditional approaches that are often used when talking to children about their art.
- In your small group (2-3), explore each approach and complete the chart and prompt with the following: Name of Approach, Examples of the Approach and Why it is Ineffective.
- Have students practice applying the approaches as they participate in the “Name that Approach” activity.
Attachments
- Intro Art Images_Similarities & Differences (PDF)
- Developmental Benefits of Art_Notes (PDF)
- Art Station Reflections (PDF)
- Discussing Art: Six Traditional Approaches (PDF)
- Name that Approach (PDF)
Similar Lesson
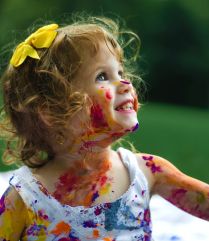
Photo by Senjuti Kundu on Unsplash
