Enrichment means to improve something…in this case the “something” was 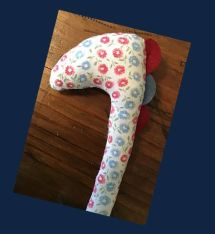 basic sewing skills (and fine motor skills). This year I chose to do a hand-sewing enrichment activity that was an extension of the rattle lesson in the infant unit. Students worked on their small motor skills while creating and hand-sewing an infant toy or rattle which was affectionately named Nessie. Please note, this project could easily be adapted to machine sewing if you have sewing machines in your classroom.
Set
- Many students have never threaded or knotted a needle much less sewn something by hand. So, I begin by demonstrating how to do both.
- Give each student a needle, spool of thread and scissors. I have them cut a piece of thread the length of the table, show them how to put it through the eye of the needle, bring ends together and then show them how to make a knot.
- To practice the basic stitch, I downloaded the Free Sewing Practice Sheet from TPT and had my students practice the running stitch as they worked through the examples. I did not have them practice the blanket stitch as we weren’t using that one in this project.
Materials
- Fabric (1/8 yard washed Cotton yields approximately 3 rattles)
- Felt (pieces or scraps large enough to cut a quarter size circle from)
- Thread (colors to match fabric)
- Paper Scissors & Fabric Scissors
- Needles
- Stuffing
- Rattle Inserts (optional)
- Fabric Markers
- Pins
- Sewing Machines (optional)
- **Above supplies are Amazon affiliate links
Activities
- Begin by passing out the paper pattern of Nessie (named after the Lochness monster–I just thought she looked similar) and have students cut them out using PAPER scissors. I have them write their name on their pieces in case they get misplaced.
- Then, pass out the fabric or allow students to choose from your stash. I am able to pick up remnants at my local thrift store for ten cents each so I let my students pick from that assortment. If you have scraps or remnants from other projects, this might be a good way to use them up!
- I happened to have some felt wreath ornaments with the perfect size circles so I just deconstructed them and had students choose 3 felt circles that went with their fabric.
- Next, I have students follow along with the slide show as we complete the remaining steps. This way I can keep the class together and assist along the way. The slide show directs students to pinning, marking, cutting, sewing, turning, stuffing, adding the rattle insert and stitching the rattle or toy closed.
- My students enjoyed this little enrichment project and were very proud of their accomplishment! They also liked that they learned a few new skills along the way!
Attachments
- Nessie Pattern (PDF)
- Nessie Sewing Project (Slide Show PDF)
