I love teaching students how to make desserts that look elegant, but sound difficult! After learning about the history and preparation steps of Lemon Posset,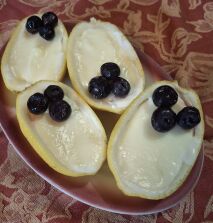 students are always surprised to learn how simple they are to actually make. Read on to learn how to incorporate this into your citrus fruit and/or dessert unit.
Set
- Show students an image of an empty lemon half or a real one if you happen to have one and ask if they’d eat out of it? Why or why not?
- For those that say no, I guess you would miss out on a tasty dessert! In Britain, this is actually a traditional way to serve a dessert called lemon posset.
- Give students the short reading about lemon posset and have them answer the corresponding questions. Go over the answers as a class or collect for a grade….your call!
Materials
- iPad or Laptop
- Projector & Screen
- Lab Supplies
Activities
- Before student head to the lab to prepare this dessert, have them complete some pre-lab activities and prompts. Give students a copy of the recipe and have them read it. You know that some will and some will quickly scan it and say they read it, but really didn’t! You’ll find out who did and who didn’t very quickly.
- The first activity requires students to sort their cards into categores: BEFORE COOKING, DURING COOKING, AFTER COOKING. This activity can be done as an individual worksheet or as a whole class movement activity. Decide how you wish to conduct the activity based on your time and the level of cooking experience your students have. If using this as an individual activity, pass out the worksheet and have students sort the statements into the appropriate category. First have them do it without their recipe. If students struggle because they didn’t read the recipe, pass the recipes back out, have them read it again and complete the sort. You may wish to allow them to refer to the recipe during the activity, but that’s up to you. If you decide to do this as a whole class activity, cut out the steps, pass them out one to each student if possible, and place headers around the room. Students must physically walk to the header that represents where their step falls in the recipe. Once sorted, the groups have to decide if all the people/steps who say they belong in that header really do. If people are in the wrong categories, they must relocate themselves and the group must reevaluate.
- The teacher will go over the actual answers to see how well students did in their placements and in reading their recipes. If you need the key to the sorting assignment, just email me at kim@familyconsumersciences.com and I’ll share it.
- Now, it’s time for them to answer the pre-lab recipe prompts. Again, students may refer to their recipes to help them answer. Go over this information before sending groups to the kitchen to prep the dessert.
- Because there is a couple of hours chill time required for this lab, students will not get to eat this until the following day.
- Once the desserts are set up, you can provide either a specific garnish or two based on your budget or you can have a little garnish bar set up for students to choose from.
- Note: If you are using this lab in your citrus fruit unit, you can also use limes and oranges, however, you may have to adjust the juice measurement in the recipe.
Attachments
- NOTE: If you wish to use this with your students or make edits, please make a copy first by going to “file”, click “make a copy” and it’s yours!
- Bell Ringer Lemon Half Image & Prompt
- Lemon Possets Excerpt History Reading & Prompts
- Lemon Posset Sort It Worksheet
- Lemon Posset Recipe & Pre-Lab Questions