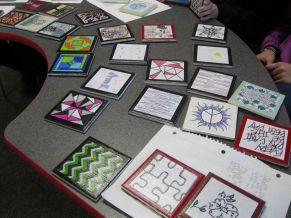
What do you do when your custodian has leftover tiles from various school projects? Ask him if you can  have them for a class project! That’s what Laurie Hagberg, a FACS teacher from Mankato West High School, Minnesota did. Laurie uses these tiles in a refurbished coaster project in her Interior Design class that not only reinforces the color schemes, but show’s her students how they can recycle items into gifts for their future homes, apartments and/or dorms. Students enjoy this creative, hands-on project and are excited to take them home!
Set
- Before beginning this project the basics of color theory (schemes and groups) have been taught.
- Students are instructed to implement their knowledge of color by using the paper templates to create designs with colored pencils, markers, chalk, or crayons. Students will sketch out four designs using images from the Internet as inspiration or create their own.
- Once the sketches are complete and teacher approval has been obtained, students choose their two favorite designs for the tile project.
Materials
- 4″ x 4″ ceramic tiles (enough for each student to have two)
- Mod Podge Glue
- Rubbing Alcohol
- Cotton Balls
- Colored Pencils, markers, chalk or crayons
- Glue Gun
- Felt
Activities
- Once students have selected their two favorite designs, they begin the coaster project.
- First students must clean off the tiles with rubbing alcohol and cotton balls to remove dust and fingerprints.
- To apply the image students will trim their images with a straight or decorative scissos. placing plastic or waxed paper under tiles to prevent them from sticking to the table.
- Gently brush a generous amount of clear craft glue on top of tile and center one sheet of the image on the tile surface, holding in place. Press firmly on the paper with thumbs, beginning in the center and working to the edges.
- Gently press air bubbles out by re-directing them to the outer paper edges. Note: It’s important to work fast as the craft glue dries rapidly and ensure the edges are completely tacked down or the image will not adhere.
- Repeat the process with the second design and tile.
- Reapply another coat after each layer dries. The amount of layers depends on your personal preference; more layers will create a heavier, textured effect.After glue dries for at least 15 minutes, Brush 1 coat of craft glue over each image. *Brush in one direction only, painting around the edges and along the tile sides.
- Allow top (first) coat to dry overnight. Add another layer, but paint it on using brush strokes in the opposite direction from how you appied it for the first coat. This gives a textured appearance on the surface.
- After the coasters have dried overnight, students will cut and affix felt to the bottom/back of the tiles, using glue from a hot glue gun. Keep tile upside down until dry and before handling.
- Finally, after completing the coasters, students must compose one 4-6-sentence paragraph for EACH of their 2 coasters. They are to include the color scheme or group they selected and explain how they incorporated the colors into their design. Students are to reflect as to why they selected the tile and felt colors they did and describe the overall effect they were trying to achieve with their tiles.
Attachments
- Design Tile Directions (PDF)
- Design Tile Template (PDF)
- Design a Tile Project _15 (PDF)
Tile Resources
- If you need to purchase tiles you can find them at places like Home Depot and Lowe’s.


1 comment for “Design a Tile Project”