As I’m casually looking at social media, I often see requests for quick, easy and inexpensive sewing projects. The Embroidered Tea Bag Bookmark: A Hand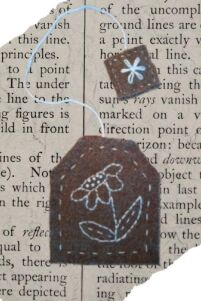 Sewing Project is perfect for all grade levels, experience levels and a great way to use up those odds and ends of scrap fabrics. It can also be done in a couple of class periods, allows for personal creativity and develops fine motor skills. A win, win, win all the way around!
Teacher Notes
- Be sure to have solid color fabric scraps that will work size-wise for this project. I made my sample out of some wool fabric scraps I had, but you can use felt, denim, wool or muslin.
- Hoops are not necessary for this project. Just be sure to remind students not to pull their thread too tight that it curls or buckles the fabric.
- Be sure you have demonstrated and/or taught students how to separate embroidery floss, thread and knot the needle and the basic hand sewing embroidery stitches: The straight stitch, back stitch, lazy daisy stitch, French knot and the blanket stitch. Here’s a resource on Embroidery Stitches that may be helpful.
Materials
- Solid Fabric Scraps (Wool, Denim, Felt, Muslin)
- Twine, Ribbon, Heavy String
- Embroidery Floss–Variety of Colors (affiliate link)
- Paper & Fabric Scissors (affliliate link)
- Pinking Sheers (optional) (affliliate link)
- Pins & Needles (affiliate link)
- Blue Washable Fabric Markers (affiliate link)
Directions
- Provide students with a tea bag paper pattern and have them cut it out with paper scissors. This is a great opportunity to talk about the different types of scissors and what can happen when fabric scissors are used to cut paper. If you’re not aware, they dull them very quickly.
- Next, have students choose their fabric and pin their tea bag pattern to it. Be sure to cut out 2 pieces of fabric for each part; tea bag and tag. If you want the tea bags to have a more decorative edge, use pinking shears if you have them.
- After the pattern pieces are cut out, students will need to sketch a design onto the solid fabric using a fabric marker. I like the blue ones that disappear with cold water when done. Be sure to remind them to sketch their design in the middle of the fabric. Have them try to center it and leave enough space to stitch a border around the tea bag and tag. Designs should be simple, without too much detail especially for beginners. Ideas may include hearts, flowers, letters/initials, simple shapes, mushrooms or animals.
- Once students have sketched their design on one of the tea bags and one of the tags, it’s time to choose floss colors, separate them into 3 strands and begin embroidering. Remind them to always insert their needle from the back side of the fabric so they can hide their knots. I kept my sample simple by only using one color. You may wish to limit the number of colors students use and/or require them to use at least 3 different stitches to make their designs more interesting.
- After students have finished embroidering their design, they need to cut an 8-10 inch section of twine, ribbon or heavy string. Have them pin it to the wrong side of their tea bag design and their tag design. Hand stitch it in place making sure the stitches don’t show on the front. This is to secure it.
- Next pin the tea bag sections and the tag sections together (wrong sides together) with the stitched design on the outside. Now students can sew the two pieces together using a straight stitch or a blanket stitch. I find the straight stitch is easier for beginners, but more experienced enthusiasts can try the blanket stitch.
- Once the tea bags and tags are sewn together with the string sewn securely between them, they are done!
- Students can keep their bookmarks or they can donate them to the library or senior center or make child-friendly ones to give to students in the elementary school.
- Optional, before students take their bookmarks home or donate them, create a display if possible to show off their work and skills and to promote reading in general!
Attachments
- Tea Bag Bookmark Directions (PDF)
- Tea Bag Pattern (PDF)
- Tea Bag Rubric (PDF)
- Embroidery Stitches (Link)
