Have you ever seen a scene from a movie and thought, “Wow that would be good to show my students!” Well, thanks to technology it is now easy to take movie clips from DVD’s and show them to your students. There are many programs that do this but my favorite one is AOA DVD RIPPER. It is free to use if you take a clip less than 10 minutes long and for my purposes ten minutes is plenty.
FYI: the full version costs $34.95 which allows you to completely copy a DVD.
How it works:
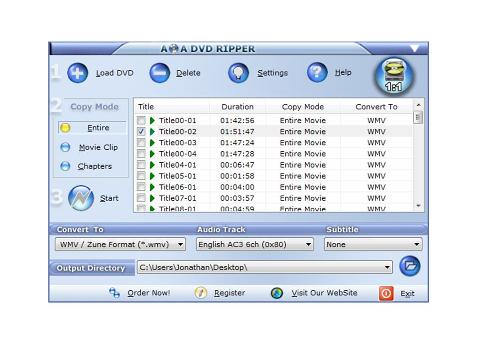
First you have to go on AOA DVD Ripper’s website and click “Download Free Trial” on the right hand side. Once you have installed the program
1. Load DVD: Select “Import from DVD disk”
2. select “MOVIE CLIP”
3. click, “START”
 ——————————————————————————————————————————–
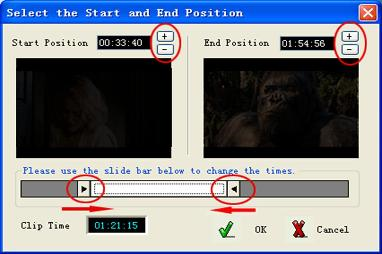
Then you use the sliders to select the start and end positions of the clip you want to take. Remember for the free version you can only take up to a ten minute clip. The frames from the movie will appear in the boxes above the sliders. When you’re done you select okay.
Opening and Viewing the Clip
1. You can then open your clip from the location you chose on the original screen under: “Output Directory.” It seems to automatically put it on your desktop if you don’t tell it where to save.
2. Your file will then open with Windows Media Player.
3. You can simply copy this file onto your jump drive or on a CD to play at school for your students.
For more information on how to take clips with this software click here.


1 comment for “How to Take a Movie Clip”