
My junior high students have always struggled with multiplying fractions when I teach how to adjust recipes. I didn’t realize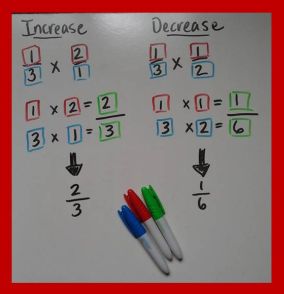 how much until I implemented a pre/post-test as my student learning outcome (SLO) project for my teacher evaluation. Students weren’t grasping this concept and it was consistently showing up as a weak area. I realized I needed to add more practice to what I was teaching my students in class so I decided to make it a little more interactive. This lesson is very adaptable to the ISN if you are using them in your classroom.
NOTE: Inform students that we will have a special guest with us today in class and introduce that guest as Math, specifically multiplying fractions! Students always ask why they have to know math and when are they ever going to use it in real life. This lesson is a perfect example of how they might do that.
Set
- Early in my teaching career I taught a foods class and we were studying bread. At the time, one of the school lunches that students looked forward to was vegetable soup, Lebanon bologna sandwiches and sticky buns. These sticky buns were to.die.for….they.were.awesome!! Anyway, my students wanted the recipe so I allowed them to go ask the cafeteria staff if they would share it with them. They came back to class with a “deer in the head lights” look on their face. I asked what was wrong and they replied that the recipe fed 800 people. So we began adjusting the recipe to try to get it down to a manageable amount.
- After I share that story and explain that sometimes we need to adjust recipes to feed a certain number of people.
Materials
- glue & scissors
- colored markers
- cooking magazines or magazines with recipes
Activities
- I start by going over the basic rules of multiplying fractions and then we specifically practice multiplying whole numbers and fractions, mixed numbers and fractions and fractions with fractions using the 3 marker color process. Set up the fraction example. Let’s use 1/3 to illustrate both increasing and decreasing.
- Step 1: Set up the problem
- Step 2: Draw a red box around your numerators
- Step 3: Write those numbers again on a new line and draw a red box around each numerator
- Step 4: Multiply your red box numbers and draw a green box around the answer
- Step 5: Draw a blue box around your denominators
- Step 6: Write those numbers again on a new line and draw a blue box around each numerator
- Step 7: Multiply your denominators and draw a green box around the answer
- Step 8: First green box from multiplying numerators is now your new, adjusted numerator and the second green box from multiplying denominators is now your new, adjusted denominator. Place a line between the two.Repeat with second example.
- I then put some numbers on the board or SMARTBOARD from the PPT below and have students practice increasing and decreasing them in their notes and then I randomly assign them to come to the board to show their work. My students love to come to the board. We then go over the problems, and I answer any questions they have.
- Have students practice their new skill by completing the cut & paste Adjusting Recipe Amounts problems. Set up and solve the problems using the marker technique and then cut apart the correct answer and glue it into the box. It should be a great way to check their work. There are two versions of this activity; one they cut & paste the correct numeral answer to the word problem and the other they cut & past the correct problem to the answer. Use which ever one best suits your student needs.
Assessment
- Finally, each student is given a random recipe that contains at least 8 ingredients with a mixture of ingredient amounts (whole #’s, mixed #’s and fractions). I usually get the recipes out of the old magazines like “Taste of Home” and “Light Cooking”. This also allows me to match up recipes with students’ math abilities as I can give gifted or learning support students recipes that match their understanding. It’s a great way to differentiate in the same activity/assignment. Students then glue this onto their paper, and using colored markers show the increased or decreased amounts based off of the original. Note: I don’t have large classes so the grading of this isn’t too bad. However, if you have large classes I would collect and copy a couple of different recipes in varying levels of difficulty and spread them out among your students. This way you have a limited number of keys to prepare, thus making grading a little easier especially if you have rotating sections of students. Again, there are two versions of this to choose from.
Attachments
- Adjusting Recipes Practice (PPT)
- Adjusting Recipes Amounts Cut & Paste I (PDF)
- Adjusting Recipe Amounts Cut & Paste II (PDF)
- What’s Cooking Magazine Recipe Assignment (PDF)
- Adjusting Recipe Amounts ISN Style (PDF)
